
Unlocking Silky-Smooth Shots: What Are Gimbal Angles & How to Master Them?
Ever wondered how professional filmmakers achieve those incredibly smooth, stable shots that glide effortlessly through a scene? The secret often lies with a device called a gimbal, and at its heart are something called gimbal angles.
If you’ve just got your hands on a gimbal, or are considering one, understanding these angles is your first step towards creating truly cinematic video. Don’t worry, it’s not as complex as it sounds! We’re here to break it down in a friendly, helpful way, so you can transform your shaky home videos into stunning, professional-looking masterpieces.
What Exactly is a Gimbal and Why Do Angles Matter?
Before diving into angles, let’s quickly define a gimbal. A gimbal is a motorized device designed to stabilize a camera (or phone) by counteracting unwanted movements like shakes, tilts, and bumps. It uses a series of motors and sensors to keep your camera perfectly level and pointed precisely where you want it, regardless of how much your hand or vehicle moves.
So, why are “angles” crucial? Because these are the precise directions and axes along which your camera can move and be controlled on the gimbal. Mastering them means mastering your camera’s movement for truly dynamic and professional-looking footage.
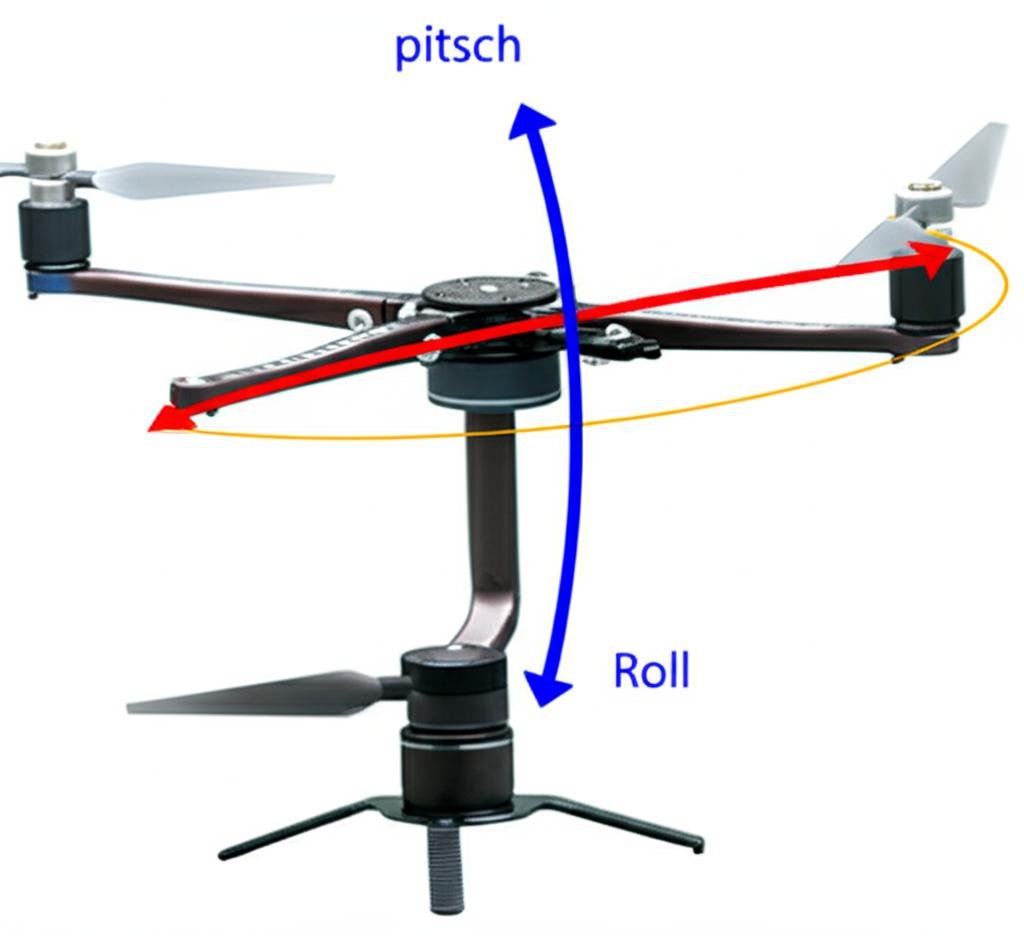
The Three Pillars of Gimbal Angles: Pitch, Roll, and Yaw
Think of your camera sitting perfectly still in front of you. It can move in three fundamental ways, each controlled by a specific motor and corresponding angle on your gimbal. These are often referred to as the three axes of rotation:
1. Pitch (or Tilt Axis)
- What it is: This angle controls your camera’s up-and-down movement, like nodding your head “yes.”
- Analogy: Imagine your camera looking up at the sky or down at your shoes.
- How it’s used: You’ll use pitch to adjust the vertical framing of your shot, follow a subject as they jump, or smoothly transition between different vertical elements in a scene (e.g., from a person’s face to their feet).
- Key takeaway: Pitch is your vertical aiming control.
2. Roll (or Roll Axis)
- What it is: This angle controls your camera’s side-to-side tilting movement, like an airplane wing banking left or right. It keeps your horizon level.
- Analogy: Think of your camera tilting its head to one side, or the horizon line in your shot rotating.
- How it’s used: While gimbals automatically stabilize the roll axis to keep your footage level, you might manually adjust it for creative effects (like a “Dutch angle” for a dramatic, unsettling look). Most of the time, the gimbal’s job is to keep this angle perfectly straight.
- Key takeaway: Roll ensures a level horizon and stable perspective.
3. Yaw (or Pan Axis)
- What it is: This angle controls your camera’s left-and-right rotational movement, like shaking your head “no.”
- Analogy: Imagine your camera panning across a landscape from left to right or vice-versa.
- How it’s used: Yaw is essential for following subjects horizontally, revealing a scene, or smoothly sweeping across a panoramic view. It’s one of the most frequently used axes for dynamic shots.
- Key takeaway: Yaw is your horizontal sweeping control.
Why Mastering Gimbal Angles Matters for Your Footage
Understanding Pitch, Roll, and Yaw isn’t just technical jargon; it directly impacts the quality and creativity of your video:
- Silky-Smooth Movements: The primary benefit! When these axes are correctly balanced and controlled, your footage will look incredibly stable, free from bumps and shakes.
- Precise Framing: You can fine-tune exactly what’s in your shot, horizontally and vertically, without awkward jitters.
- Creative Freedom: Want to smoothly tilt up a skyscraper, slowly pan across a vista, or even create a dramatic roll effect? Knowing your angles gives you the power to execute these creative visions.
- Professional Look: Stable, controlled camera movements are a hallmark of professional video production. Mastering your gimbal angles instantly elevates your content.
How Gimbals Use Angles for Stabilization
It’s not magic; it’s smart engineering! Gimbals use built-in sensors (like accelerometers and gyroscopes) to detect even the slightest unwanted movement or deviation from the desired angle. Once detected, the motors on each of the three axes (Pitch, Roll, Yaw) instantly and precisely move the camera in the opposite direction, canceling out the shake. This happens many times per second, resulting in the incredibly smooth footage we love.
Mastering Gimbal Angles: A Step-by-Step Guide
Ready to put this knowledge into practice? Here’s how to start controlling your gimbal angles like a pro:
Step 1: Balance Your Camera Perfectly (Crucial!)
- Before you even turn on your gimbal, properly balance your camera. This is the single most important step for optimal performance. An unbalanced camera forces the motors to work harder, leading to shaky footage, reduced battery life, and potential damage.
- How: Most gimbals have adjustment arms and screws. You’ll need to loosen them and slide your camera until it stays still in any position you put it, without the motors on.
- Tip: Look for specific balancing tutorials for your gimbal model online. Do not skip this step!
Step 2: Understand Your Gimbal’s Controls
- Every gimbal has a control interface, usually with a joystick or control wheel and various mode buttons.
- Joystick/Control Wheel: This is your primary tool for manually adjusting Pitch and Yaw angles.
- Pushing up/down on the joystick typically controls Pitch (camera tilts up/down).
- Pushing left/right on the joystick typically controls Yaw (camera pans left/right).
- Mode Buttons: These buttons change how the gimbal reacts to your movements. Common modes include:
- Pan Follow Mode: The gimbal primarily stabilizes Pitch and Roll, but follows your Yaw (panning) movements. This is great for smooth horizontal sweeps.
- All Follow Mode: The gimbal follows your movements on all three axes (Pitch, Roll, and Yaw). Good for dynamic, flowing shots where the camera truly mimics your natural motion.
- Lock Mode (or FPV Mode): Locks all axes, keeping the camera pointing in a fixed direction regardless of your movement. Some gimbals also have specific FPV (First Person View) modes that allow for more dramatic, non-stabilized rolls for creative effect.
Step 3: Practice Smooth, Deliberate Movements
- Once balanced and familiar with your controls, start practicing.
- Begin with simple Pan Follow movements: Walk slowly, keeping your body stable, and use the joystick to smoothly pan left and right. Pay attention to the speed and responsiveness.
- Experiment with Pitch: Try slowly tilting up and down. Combine it with walking for a rising or falling shot.
- Combine Yaw and Pitch: Practice diagonal movements, like following a subject walking away from you and slightly to the side.
- The key is slow and deliberate: Jerky movements from you will still translate to less-than-perfect footage, even with a gimbal. Think of yourself as an extension of the gimbal.
Step 4: Monitor Your Shot in Real-Time
- Most gimbals connect to a smartphone app or have a built-in screen. Always watch your shot on the monitor as you practice. This instant feedback is invaluable for refining your movements and understanding how each control impacts the final footage.
- Pay attention to:
- Horizon line: Is it staying level (unless you deliberately roll it)?
- Framing: Is your subject consistently in the frame?
- Smoothness: Are there any sudden jitters or hesitations?
Tips for Optimizing Your Gimbal Angle Usage
- Always Balance Your Camera First: We can’t stress this enough. An unbalanced setup makes everything harder.
- Walk Like a Ninja: Even with a gimbal, your body movements matter. Try walking with a slight bend in your knees, like a stealthy ninja, to absorb shocks. This is called the “gimbal walk.”
- Start Slow and Steady: Don’t try complex shots immediately. Master basic pans and tilts before attempting intricate movements.
- Practice, Practice, Practice: The more you use your gimbal, the more intuitive the controls will become. Experiment with different speeds and angles.
- Learn Your Gimbal’s Modes: Each mode offers unique creative possibilities. Understand when to use pan follow, all follow, or lock modes for the best results.
- Keep Your Firmware Updated: Manufacturers often release updates that improve stabilization, add features, or fix bugs.
- Don’t Over-Rely on the Gimbal: While gimbals are amazing, they are tools. Your cinematography skills (composition, lighting, timing) are still paramount.
Common Mistakes to Avoid When Using Gimbal Angles
Even seasoned videographers can make these slips! Be aware of them:
- Skipping the Balancing Act: This is the #1 mistake. It strains the motors, drains the battery, and results in sub-par stabilization. Always balance before use!
- Jerky, Hasty Movements: Even if the gimbal tries to compensate, sudden starts, stops, or changes in direction from the operator will create noticeable jitters. Think smooth transitions.
- Ignoring Calibration: Over time, or after a bump, a gimbal’s internal sensors might need recalibration. If your horizon seems off despite good balancing, look into your gimbal’s calibration process.
- Over-Relying on the Gimbal to Fix Everything: A gimbal stabilizes, but it won’t fix poor composition, bad lighting, or a lack of storytelling. It’s a tool, not a magic wand.
- Not Understanding Gimbal Modes: Staying in one mode all the time means you’re missing out on the full capabilities of your device. Learn what each mode does and when to use it.
- Pushing the Gimbal Beyond Its Limits: If your camera setup is too heavy, or you’re trying to move too fast for the gimbal to keep up, you’ll see judder or motor strain. Respect your gimbal’s payload limits and operational speed.
Conclusion
Gimbal angles – Pitch, Roll, and Yaw – are the fundamental building blocks of smooth, professional video. By understanding how each axis works and practicing deliberate control, you’ll unlock a new level of creative freedom and produce stunning, cinematic footage that truly stands out.
So, go ahead, balance your camera, familiarize yourself with your controls, and start practicing! The world of stable, beautiful video awaits!
FAQ
Q. What exactly are gimbal angles?
A. Gimbal angles refer to the rotational positions of a camera or device along its three primary axes (pitch, roll, and yaw) relative to a reference frame, as controlled or stabilized by a gimbal system. They define the precise orientation of the attached device in space.
Q. What are the three primary types of gimbal angles or axes?
A. The three primary gimbal angles correspond to the three rotational axes:
* Pitch (Tilt): This angle defines the up and down rotation of the camera, looking towards the sky or ground.
* Roll (Bank): This angle defines the side-to-side tilting of the camera, like when an airplane rolls its wings.
* Yaw (Pan): This angle defines the left and right horizontal rotation of the camera, similar to turning your head from side to side.
Q. Why are gimbal angles important for video and photography?
A. Gimbal angles are crucial because they enable precise control and active stabilization of a camera’s orientation. By manipulating or automatically correcting these angles, gimbals counteract unwanted movements like handshakes or vibrations, resulting in incredibly smooth, stable, and professional-looking video footage and sharp photos.
Q. How are gimbal angles typically measured or expressed?
A. Gimbal angles are most commonly measured in degrees (°), with 0° often representing a level or neutral position for each axis. They are usually expressed as a set of Euler angles (pitch, roll, yaw) relative to a home or calibration point.
Q. Can I control or adjust gimbal angles manually?
A. Yes, most modern gimbals provide ways for users to manually adjust or control the pitch, roll, and yaw angles. This is typically done using a joystick on the gimbal itself, a remote control, or via a smartphone app connected to the gimbal, allowing operators to smoothly pan, tilt, and sometimes roll the camera during a shot.
Q. How do gimbal angles contribute to stabilization?
A. Gimbals use sophisticated sensors (like accelerometers and gyroscopes) to constantly detect any unintended movements or changes in the device’s orientation. High-speed motors then rapidly adjust the camera along its pitch, roll, and yaw axes to counteract these movements, maintaining the desired gimbal angles and keeping the camera perfectly steady relative to the ground or a set horizon.
Q. What’s the difference between “gimbal angles” and “camera orientation”?
A. While closely related, “gimbal angles” specifically refer to the rotational positions controlled by the gimbal system on its physical axes. “Camera orientation” is a broader term for the camera’s actual physical direction and tilt in space. When a camera is mounted on a gimbal, the gimbal angles are the primary means by which the gimbal achieves and maintains the desired camera orientation.