< strong > Gimbals are primarily designed for videography but can be adapted for photography to stabilize shots in low light or dynamic scenes. While not ideal for static images, they excel in action photography, timelapses, and handheld scenarios where traditional tripods fall short.
< h2 > Introduction: Why Consider a Gimbal for Photography?
Photographers often debate whether gimbals—a staple in videography—have a place in still photography. The answer? Absolutely, but context matters. Gimbals aren’t replacements for tripods but tools for specific scenarios where stabilization is critical. Imagine shooting a sunset panorama while moving the camera smoothly or capturing fast-moving wildlife without shake. A gimbal can turn shaky hands into razor-sharp images. This guide explores when, why, and how to use gimbals for photography.
< h3 > How Gimbals Differ from Tripods
Tripods lock cameras perfectly still, perfect for landscapes or portraits. Gimbals, however, allow controlled movement. Think of it as a “smart tripod” that adjusts to your motion:
– < strong > Tripods: Ideal for static shots.
– < strong > Gimbals: Designed for fluid motion, reducing blur even while moving.
< h2 > 1. Action & Sports Photography
< h3 > Tracking Moving Subjects
In sports photography, athletes move unpredictably. A gimbal’s gyroscopic stabilization helps maintain focus and clarity. For example:
– **Example:** Photographing runners on a track. Without a gimbal, each stride creates motion blur. With one, you get steady, clear shots even at 1/500s shutter speed.
– **Tip:** Use “follow mode” to keep the subject centered as they move.
< h3 > Low-Light Advantages
Gimbals excel in dim lighting by minimizing hand shake. Unlike tripods, which require long exposures, gimbals let you shoot faster:
– **Example:** Nighttime street photography. A tripod might need 10 seconds exposure, risking overexposure. A gimbal lets you use 1/60s + high ISO for sharp, well-exposed images.
< h2 > 2. Panning Shots
< h3 > Smooth Horizon Tracking
Panning involves following a moving object (e.g., a car or drone) while keeping the horizon level. Gimbals automate this:
– **Step-by-Step:**
1. Set gimbal to “pan mode.”
2. Move horizontally while keeping the subject centered.
3. Shoot at 1/125s–1/250s for motion blur on background, sharpness on the subject.
– **Pro Tip:** Practice on a slow-moving train first to master the technique.
< h2 > 3. Time-Lapse & Astrophotography
< h3 > Stabilizing Long Exposures
Time-lapses often involve shaky tripod movements. A gimbal ensures consistent framing:
– **Example:** Milky Way timelapses. Tripod vibrations can ruin the effect. A gimbal keeps stars aligned across frames.
– **Hybrid Setup:** Mount the gimbal on a tripod for absolute stability during long exposures.
< h2 > 4. Handheld Situations
< h3 > When Tripods Fail
In tight spaces (e.g., crowded events), tripods are impractical. Gimbals provide handheld support:
– **Test:** Hold a gimbal for 10 seconds—notice the steadiness compared to a naked camera.
– **Caveat:** Avoid heavy lenses; some gimbals struggle with >20mm focal lengths.
< h2 > 5. Creative Effects
< h3 > Intentional Motion Blur
Gimbals help create artistic blur intentionally:
– **Example:** Flowing waterfalls. Slow pans with a gimbal mimic natural movement.
– **Settings:** Use “tilt mode” for dynamic angles (e.g., birds in flight).
< h2 > Common Mistakes to Avoid
< h3 > Overusing Gimbals
– **Issue:** Gimbals can make photos look too “smooth,” losing spontaneity.
– **Fix:** Reserve them for challenging scenes, not every shot.
< h3 > Battery Life
Gimbals drain batteries quickly. Always carry spares.
< h2 > Conclusion: Is a Gimbal Worth It?
Gimbals are game-changers for specific photography niches but aren’t universal solutions. They’re worth investing in if you shoot:
– Action/sports
– Low-light environments
– Pans or time-lapses
For landscapes or portraits, trust your tripod. Experiment to find your sweet spot!
< h2 > Key Takeaways
< ul >
< li >< strong > Purpose: Gimbals stabilize motion blur, making them great for action shots or moving subjects.
< li >< strong > Limitations: Overuse may reduce artistic intent; static photos often prefer tripods.
< li >< strong > Best Use Cases: Low-light environments, panning shots, or handheld situations needing extra stability.
< li >< strong > Settings Matter: Adjust sensitivity and modes (e.g., follow vs. lock) for optimal results.
< li >< strong > Hybrid Approach: Combine gimbals with tripods for complex setups like time-lapses.
—
[FEATURED_IMAGE_PLACEHOLDER]
Quick Answers to Common Questions
< h3 > Question 1?
< p >Can I use a videography gimbal for photography?
< h3 > Question 2?
< p >Yes, most gimbals work with both video and photo modes. Check compatibility with your camera.
< h3 > Question 3?
< p >What’s the best gimbal for action photography?
< h3 > Question 4?
< p >DJI Ronin-S or Zhiyun Smooth 5 are top choices for their weight and stability.
< h3 > Question 5?
< p >How do I avoid over-smoothing my photos?
< h3 > Question 6?
< p >Limit gimbal use to dynamic scenes; rely on tripods for static shots.
Frequently Asked Questions
< h3 > Can gimbals replace tripods entirely?
< p >No. Tripods offer precision for static shots, while gimbals handle motion. Use both strategically.
< h3 > Are gimbals expensive?
< p >Mid-range models ($200–$500) balance cost and performance. Premium options exceed $800.
< h3 > Do all cameras fit gimbals?
< p >Most do, but check weight limits. Heavy DSLRs may require specialized models.
< h3 > How long does training take?
< p >Basic control takes days; mastery (e.g., smooth pans) needs weeks of practice.
< h3 > Can I attach a lens filter?
< p >Yes, but bulky filters may affect gimbal balance. Test before shooting.
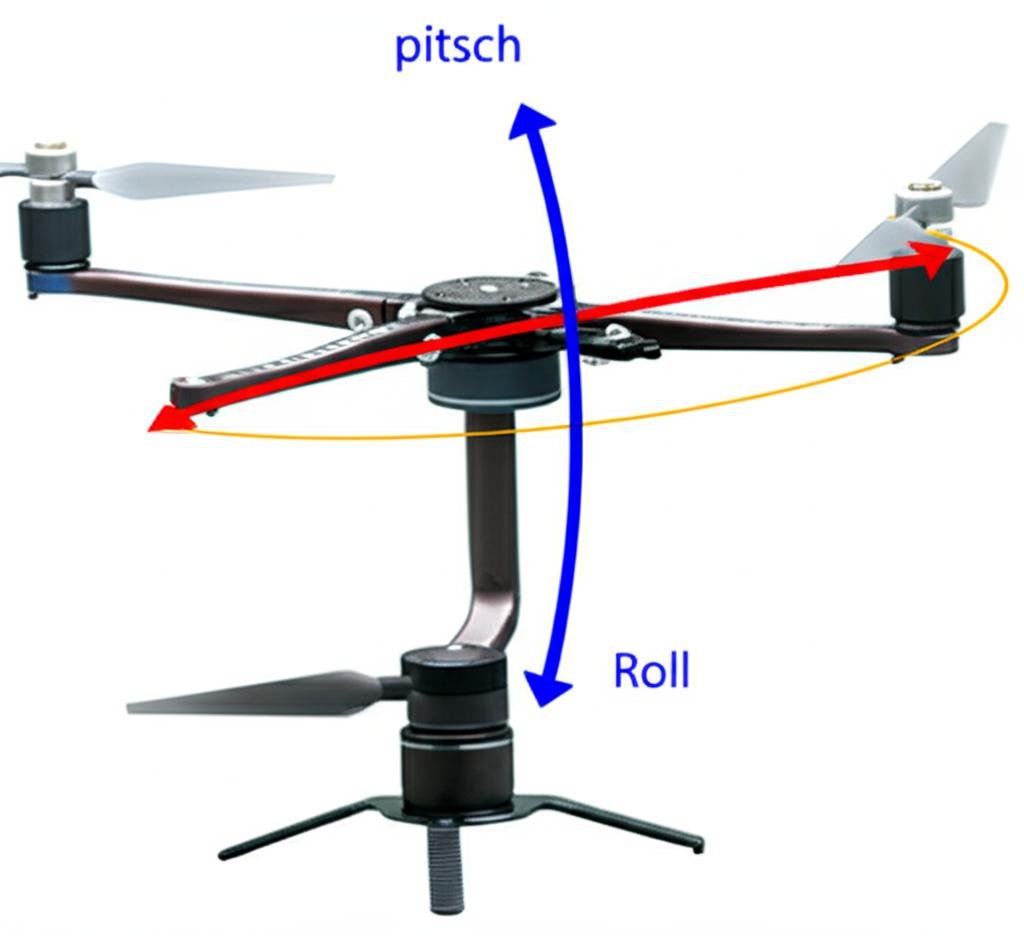
< h3 > What’s the difference between 2-axis and 3-axis gimbals?
< p >3-axis (pitch/yaw/roll) offers full stabilization; 2-axis lacks roll adjustment, limiting flexibility.